INSTALLATION INSTRUCTIONS
IMPACT Air Hammer Air Cleaners for XL Applications
|
Congratulations on your purchase of a quality AIR HAMMER Air Cleaner from HAMMER PERFORMANCE. Please follow these instructions carefully
for successful installation.
- To promote efficient combustion, maximize power, and reduce carbon build-up, Air Hammer air cleaners do not recycle the engine's blow-by
back into the intake tract the way the factory setup does. For this reason, it's necessary to reroute your engine's crankcase vents. Common
methods for doing this include the use of breather "banjo bolts" used with fittings or with a "horseshoe" breather, and routed to either
an open hose, a breather filter to absorb the moisture component of the blow-by, or a vented catch can. These accessories are
available from HAMMER PERFORMANCE. These instructions will show the use of a horseshoe breather, however, standard banjo fittings work the same way.
- Remove the factory air cleaner per the instructions in the service manual, leaving the carburetor or throttle body in place. EFI Sportsters have a support
bracket for the throttle body, leave this bracket in place. Carbureted Sportsters will require a support bracket, available from HAMMER PERFORMANCE.
- If your bike is carbureted, place the new support bracket in place, with a new gasket between the bracket and the carburetor (note that the included gaskets are adhesive backed).
Start the 3 included 1/4-20 x 1" screws through the support bracket and into the carburetor to maintain alignment.
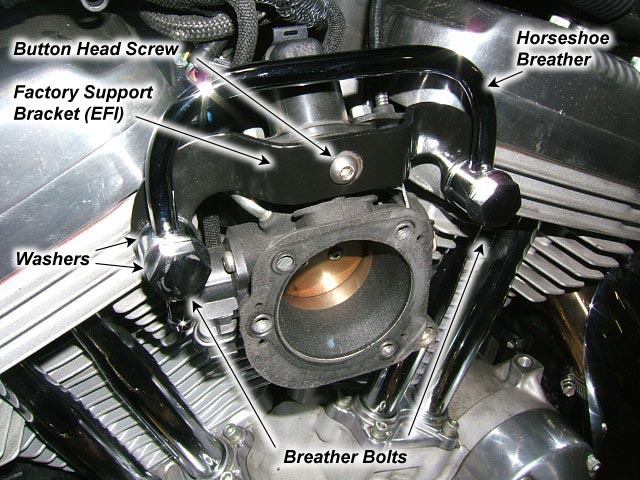
- On EFI bikes, remove the socket head screw that holds the factory support bracket to the throttle body, and replace it with the provided button head screw as shown.
Put a little Loctite Blue onto the threads of this screw and tighten it to 80in-lbs.
- During the process of removing the factory air cleaner, the factory breather bolts were removed. Install the new hollow breather bolts and
horseshoe as shown in the photo above. Be sure to put a washer on each side of the banjo as shown. Put a small amount of silicone or other gasket sealer
onto the threads of the breather bolts, and tighten them to no more than 18 ft-lbs. As these bolts are hollow, excess torque will cause them to twist and break.
The sealer on the threads is to keep them from coming loose.
- Note that your breather kit may include additional hardware not shown above. This is because the kits are generic and designed to be used in a number
of different applications. You really only need the hardware shown above, you can discard the rest.
- Attach a piece of 3/8" hose to the outlet of the breather and route to a catch can, breather filter, or leave it open. Be sure that no oil dripping out of the hose can get
onto the tire or onto the ground in the path of the tire.

- Using a new gasket (included), place the air cleaner back plate over the carb or throttle body mouth and install the 1/4-20 x 1" screws. BE SURE TO USE LOCTITE BLUE ON THESE SCREWS!
If any of these screws comes loose, it will be sucked into the engine and cause great damage. Tighten the screws to 90in-lbs.

- If using the factory cover:
- Attach the filter element using the four 1/4-20 x 3/4" screws as shown. Loctite Blue is not a bad idea here either. Tighten the screws to 80in-lbs.
- Make sure the four rubber bumpers are in place as shown.
- Remove the plastic edging that surrounds the inboard edge of the factory cover, if present, leaving only the bare metal.
- Attach the cover to the element using the two provided Phillips-head screws. Use Loctite Blue on the threads and tighten securely

- If using a billet outer plate:
- Remove the four rubber bumpers from the filter element (they just pull off). Save them in case you ever want to run with a cover.
- Seal the two large cover mounting screw holes on the face of the air cleaner using silicone sealer or duct tape.
- The four 1/4-20 x 3/4" screws go through the outer plate, through the filter element, and into the standoffs as shown. Use Loctite Blue and tighten the screws to 80in-lbs.
- Your AIR HAMMER air cleaner is installed! Now go Pound Your Competition!
|
|
|